Go to CRM → Customers → + New customer, fill in the name and contact details, then on the customer record click + Add service location and, under that location, + Add equipment. A customer is the person or company you bill; a service location is an address you work at; equipment belongs to a location. One customer can have many locations — a home and a rental, or a dozen storefronts.
Moving a whole customer list over? Import it instead: Import your customers and price book.
Who can do what
| Admin | Sales | Field | |
|---|---|---|---|
| Create and edit customers and locations | Yes | Yes | No |
| Add and edit equipment, name systems | Yes | Yes | Yes |
| Remove equipment or a location (Field users don't see Remove) | Yes | Yes | No |
| Delete a customer | Yes | No | No |
| Import customers | Yes | No | No |
Techs can add equipment because they're the ones standing in front of it. In the phone app that's Add unit at this address on a job's equipment — see the mobile app guide and Scan data plates to fill in equipment.
1. Create the customer
Go to CRM → Customers and click + New customer. Only Name * is always required. The other fields:
| Field | What it does |
|---|---|
| Company, Phone, Email | Contact details. The phone and email are where quotes, invoices and texts go. |
| Billing address, City, State, Zip | Where the bill goes. The service address is separate (step 2). |
| Lead source | Free text — referral, google, yard sign. |
| Messages in | English or Español: the language of the job-complete email and text, and the pages they link to. |
| Maintenance agreement, Discount % | A plan name and a percent that comes off the total on every invoice for this customer. |
| Sales tax exempt, Certificate # | Pick a reason to stop sales tax on this customer's invoices; the reason goes over to QuickBooks with them. Keep their certificate on file. |
| Notes | Anything else. Shown on the record under Notes. |
In Billing address or Street address *, start typing the street and pick the match from the list to fill in city, state and zip. If no list appears, type each field yourself.
Click Create customer. You'll know it worked when the customer record opens with their name at the top.
A field marked with * beyond the name is one your admin has made required — see CRM Admin settings. The create button stays greyed out until required fields are filled, and a required field can't be cleared later.
2. Add a service location
On the customer's Locations & equipment tab, click + Add service location.
- Street address * is always required. Label is a short name like "Home" or "Rental — 214 4th St".
- Property type: Residential or Commercial.
- Access notes: gate code, lockbox, dog in yard, attic hatch. They show on the location as Access: for everyone on your team who opens the customer, techs included, and are stored encrypted.
- Sales tax rate: leave blank to use your default. Set it only when this address is in a different tax jurisdiction from your office.
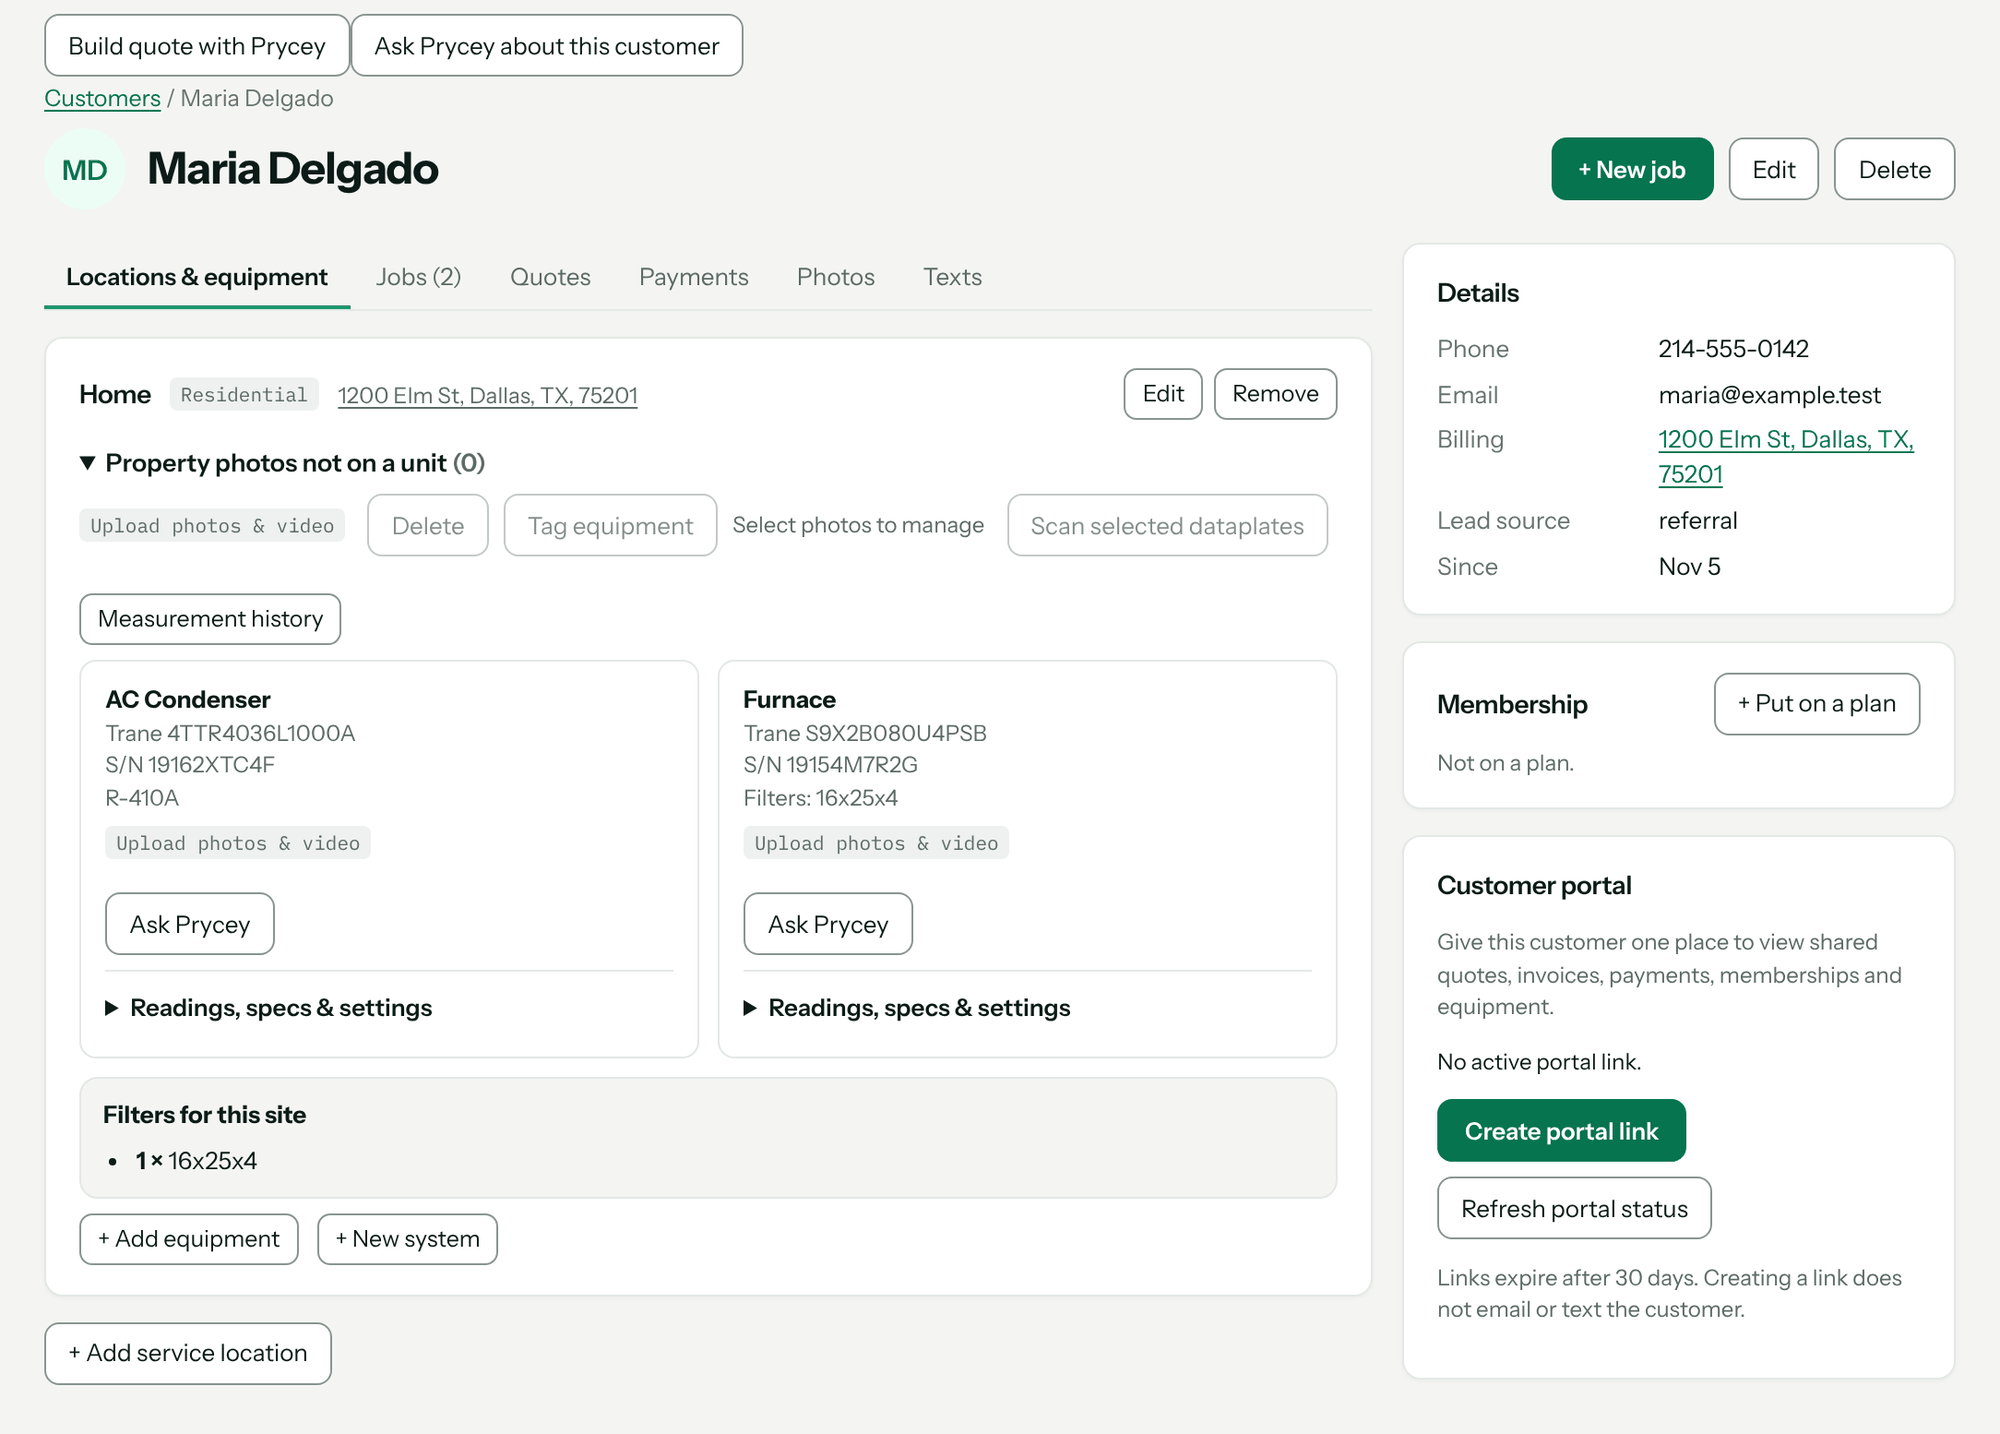
Click Add location. Each location gets its own panel with an address link that opens Google Maps, and Property photos not on a unit for photos of the house, panel or roof.
3. Add equipment
In the location's panel, click + Add equipment. Type * is required — Furnace, AC condenser, Heat pump, Air handler, Mini-split, Boiler, Water heater, Thermostat and others. Then fill in what you have:
- Unit tag — what's stencilled on the cabinet: 1, RTU-1, AHU-2 attic.
- Brand, Model, Serial, Installed (date), Refrigerant.
- Filters — + Add filter for each size, with Qty and Where / type (return grille, MERV 11). The location then shows Filters for this site: every size and count across all its units, the list you load the truck from.
- Notes and the unit's specifications.
Click Add equipment. Each unit appears as a card with make, model, serial and filters. Open Readings, specs & settings on a card for its readings history, specifications, Edit and Remove (Field users don't see Remove). Readings are covered in Record readings and diagnostic checks.
4. Group equipment into systems
A system ties together what runs as one — a condenser, coil and furnace serving upstairs. Click + New system and give it a name like "Upstairs system" or "RTU-2". Then, on each unit's card under Readings, specs & settings, choose the system from the dropdown. Units not in a system are listed under Unassigned. Deleting a system leaves its equipment in place, just ungrouped.
If your account has the map turned on, Site map on a location opens a satellite view where you can pin each unit.
The customer record
| Tab | What's on it | Who sees it |
|---|---|---|
| Locations & equipment | Every service location, its systems, equipment cards and photos. | Everyone |
| Jobs | The customer's jobs with location, date and status. | Everyone |
| Quotes | Their quotes, and + New quote. | Admin, Sales |
| Payments | Everything this customer has paid. | Admin, Sales |
| Photos | Photos and video from their properties, equipment, jobs and texts, with filters for Needs tagging and Tagged, and a Recycle bin for removed photos. | Everyone |
| Texts | Text conversations with this customer. | Everyone (techs: their own jobs' customers) |
On the right: Details (phone, email, billing, lead source, agreement, tax exemption, customer since), Membership (Pro plan — see Recurring maintenance visits and memberships), Customer portal for the office (see Share a branded customer portal), and Notes. At the top, + New job starts a job for this customer — see Create jobs and schedule visits.
Finding a customer
The search box on CRM → Customers matches the customer's name or company. The list is alphabetical and shows up to 500 customers at a time, so search for anyone further down.
Removing things
- Delete a customer (admins only) from the top of their record. They move to the CRM trash for 30 days; any visits booked online are cancelled and the homeowner is emailed. See Restore deleted customers, jobs and quotes.
- Remove on a piece of equipment moves it to the CRM trash too.
- Remove on a location deletes it for good, so it only works on a location with no equipment and no jobs.
Troubleshooting
| You see | Why | Fix |
|---|---|---|
| Missing required fields: Billing address, Billing city | Your admin made those fields required, and they were left blank or cleared. The message names each field by its label. | Fill them in, or an admin changes Required fields under CRM Admin → Jobs & field. |
| Required equipment fields: Install date, Serial. Ask the office to complete fields unavailable on the phone. | A tech added a unit in the app without a field your admin made required for equipment. | Fill them in on the phone if you can read them off the unit; otherwise the office completes them on the web. |
| location has equipment or job history — move or remove those first | Locations with history can't be removed. | Remove the equipment first. A location with jobs stays. |
| Enter a tax rate between 0 and 25%, or leave it blank to use your default. | The location's tax rate is out of range. | Type the percent, e.g. 8.25, or leave it blank. |
| Couldn't cancel the homeowner's online booking, so nothing was changed. | The customer has a visit booked online that couldn't be cancelled. | Try again in a moment; the customer wasn't deleted. |
| Photos are limited to 15 MB; videos to 250 MB. | The file is too big. | Upload a smaller copy. |
| forbidden | Your role can't make that change. | Ask an admin, or see the table at the top. |
Questions: [email protected].