Go to CRM → Web forms, click + New form, set the fields, then copy the link or the embed code onto your website. Every submission lands in CRM → Leads. From there you call the lead back, move it along, and click Convert to customer when they book. Leads and web forms are office screens: an Admin or Sales user can use them; Field users don't see them.
1. Create the form
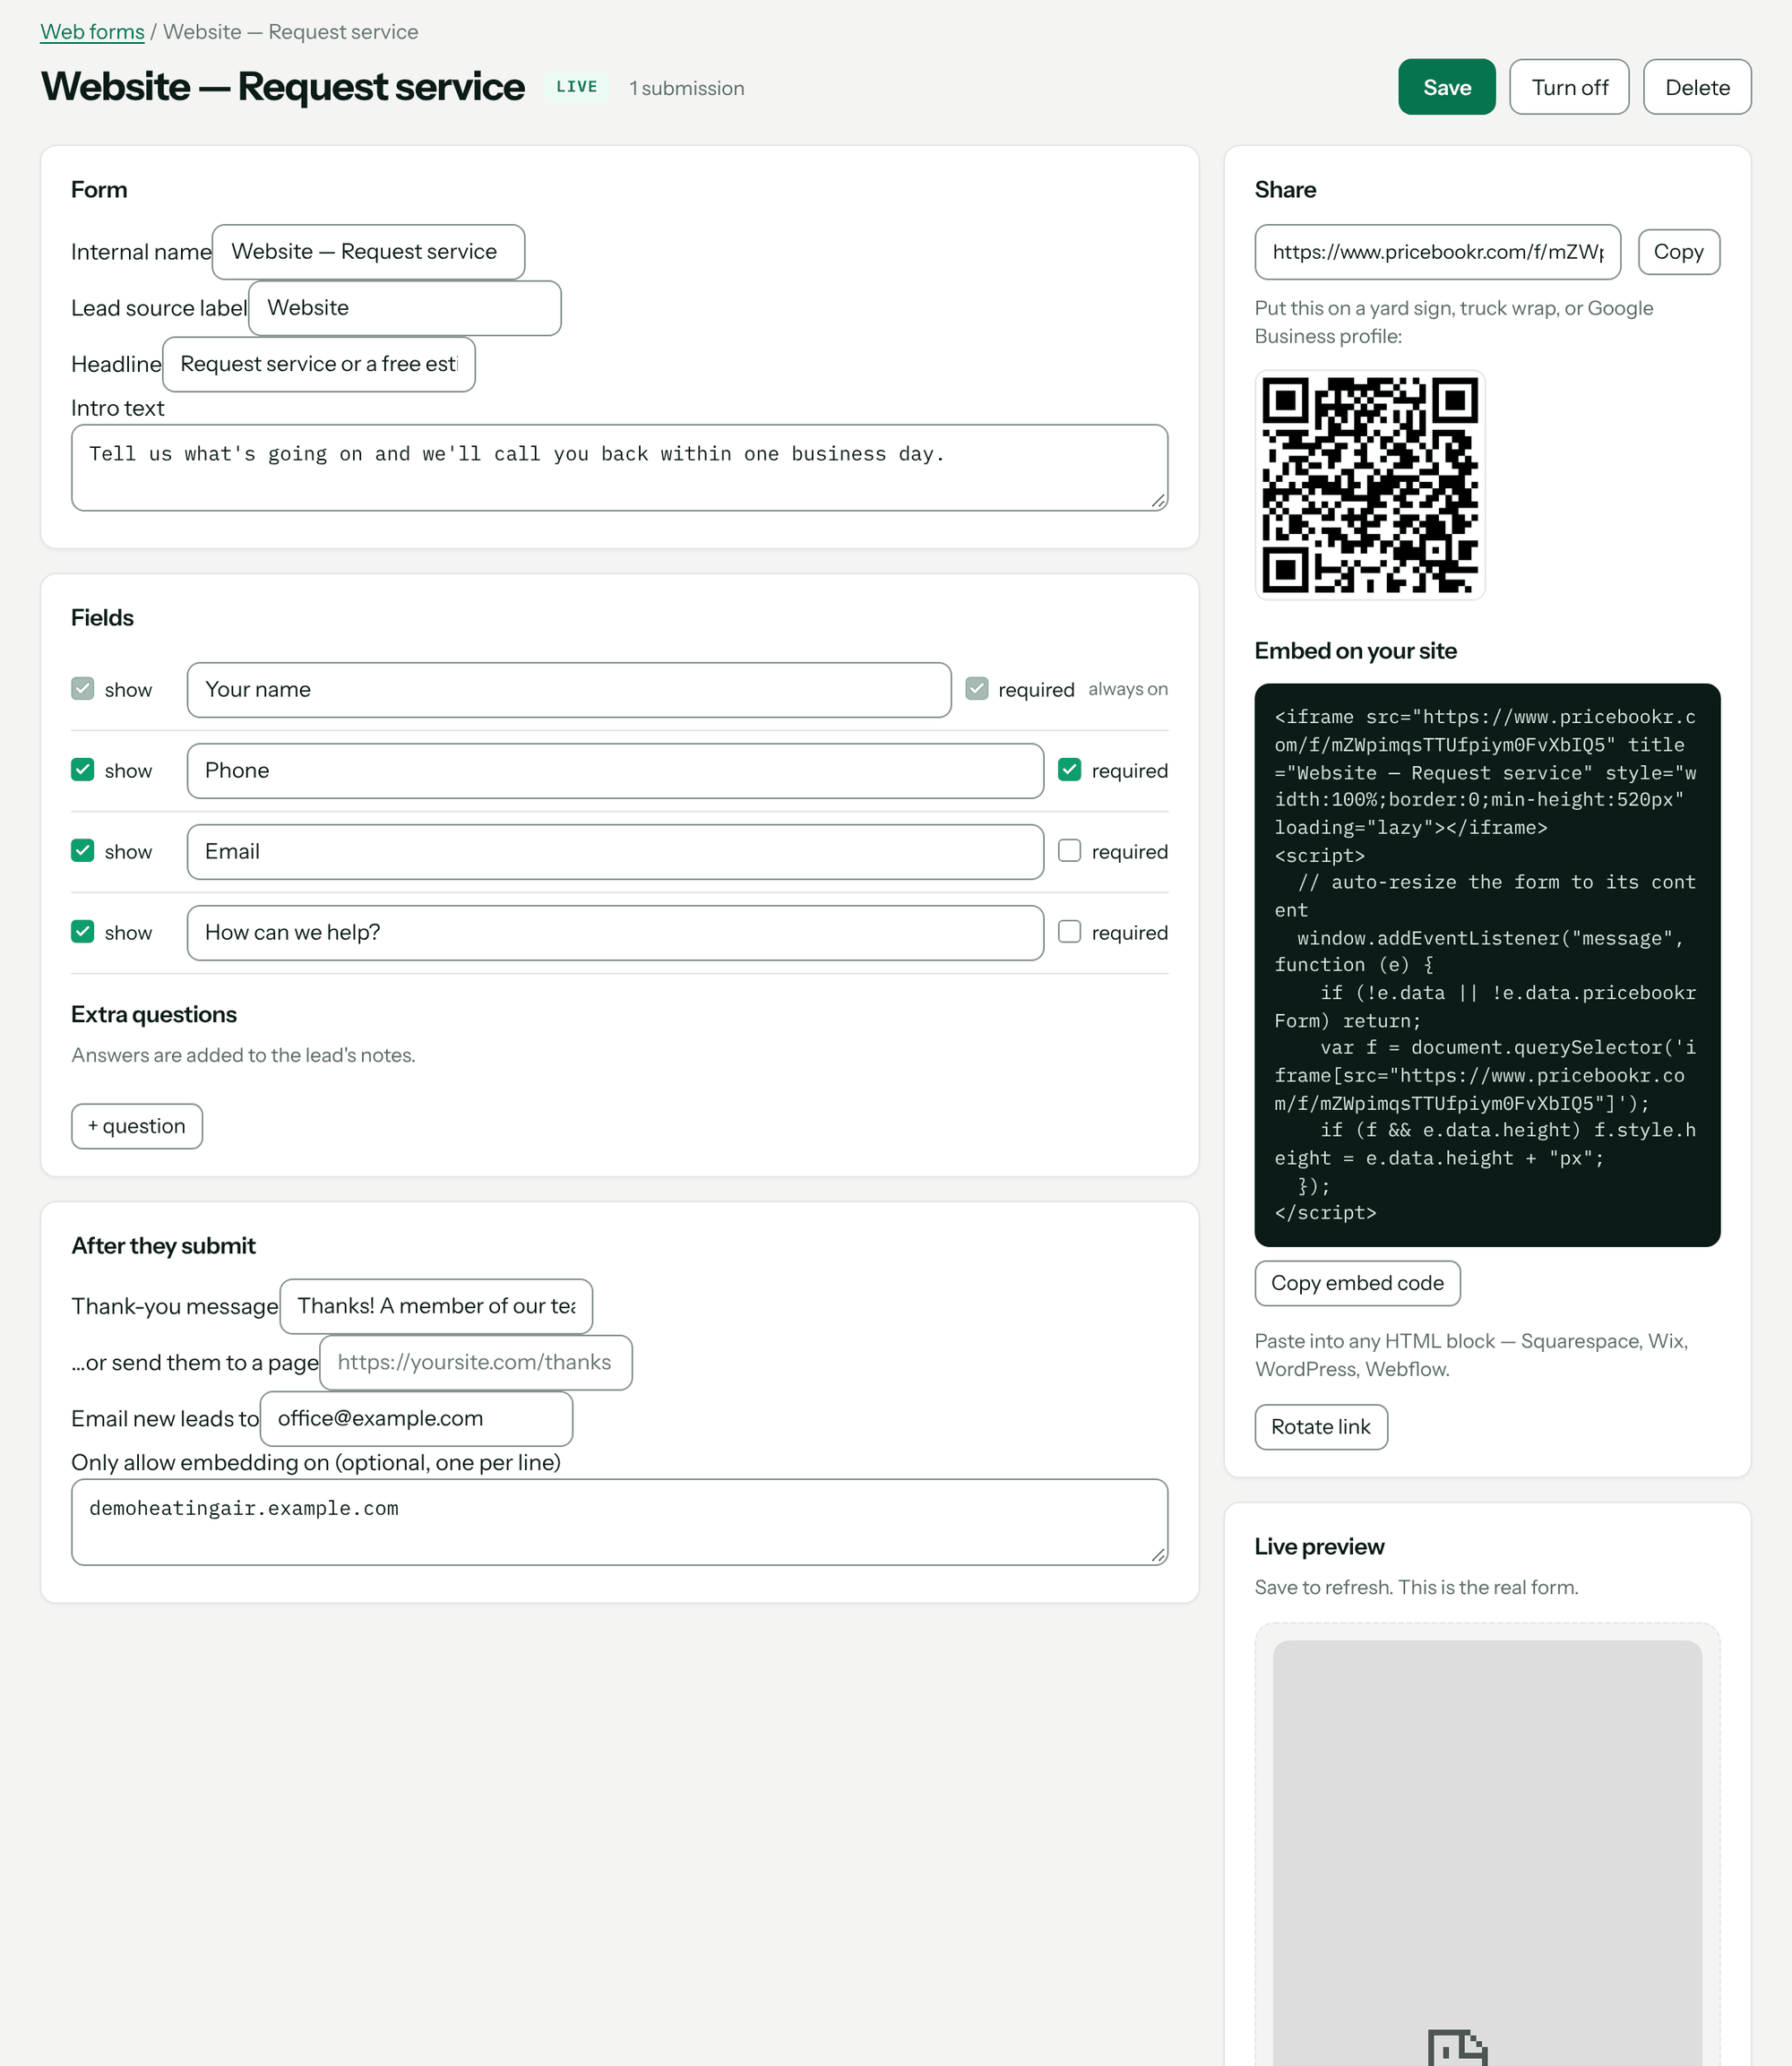
Go to CRM → Web forms and click + New form. A form called "Website contact form" is created and opened. The editor has three panels on the left and the share tools on the right.
| Panel | Setting | What it does |
|---|---|---|
| Form | Internal name | What you call it in Pricebookr. Customers don't see it. |
| Form | Lead source label | Written into the Source of every lead this form creates, so you can tell the website form from the yard-sign QR code. |
| Form | Headline, Intro text | The heading and short paragraph at the top of the form. With no headline, the form says "Contact" and your company name. |
| Fields | show / required | The form has four fields: name, phone, email and a message box ("How can we help?"). Tick show to include one and required to make it mandatory, and rename the label if you like. The name field is always on. |
| Fields | Extra questions | Up to five of your own questions, added with + question. Answers are added to the lead's notes. |
| After they submit | Thank-you message | What the homeowner sees after they send it. The default is "We got your message and will be in touch shortly." |
| After they submit | …or send them to a page | A web address to send them to instead, such as a thank-you page on your site. |
| After they submit | Email new leads to | Who is emailed when a lead comes in. It starts as the email of the person who created the form. |
| After they submit | Only allow embedding on (optional, one per line) | Your website's domain. Once set, the form only loads inside an embed on those sites; leave it blank to allow any site. |
Click Save. The Live preview on the right reloads with your changes — it is the real form, not a mock-up.
2. Put it in front of customers
Under Share in the form editor you have three ways out:
- Link — click Copy next to the form link and paste it into your Google Business profile, a Facebook page or an email signature.
- QR code — for a yard sign, truck wrap or leave-behind. Scanning it opens the same form. The code is drawn in your browser; the form's link isn't sent to an outside QR service.
- Embed on your site — click Copy embed code and paste it into an HTML or code block in Squarespace, Wix, WordPress or Webflow. The form resizes itself to fit.
You'll know it worked when you fill in the form on your own website and the lead appears under CRM → Leads, and the form's Submissions count goes up by one.
3. What the homeowner sees
A short form with your headline, the fields you turned on, any extra questions, and a Send button. They have to leave either a phone number or an email. After sending they see your thank-you message, or land on the page you chose.
If you have texting set up — a Twilio account connected and a number chosen — and the form shows the phone field, the form also shows an unticked box asking permission to text them about appointments, quotes and jobs. A tick is recorded as their consent to texts, with the form name and the page it was on. See Text customers from your own number.
Spam protection is built in: bot submissions are dropped silently, and the same person submitting the same form twice within 10 minutes makes one lead, not two.
4. Work the lead
Go to CRM → Leads. Each lead shows its email, phone, source, age and status. You can also add a lead by hand — someone who called the office — with the name, email, phone and source boxes at the top and Add lead.
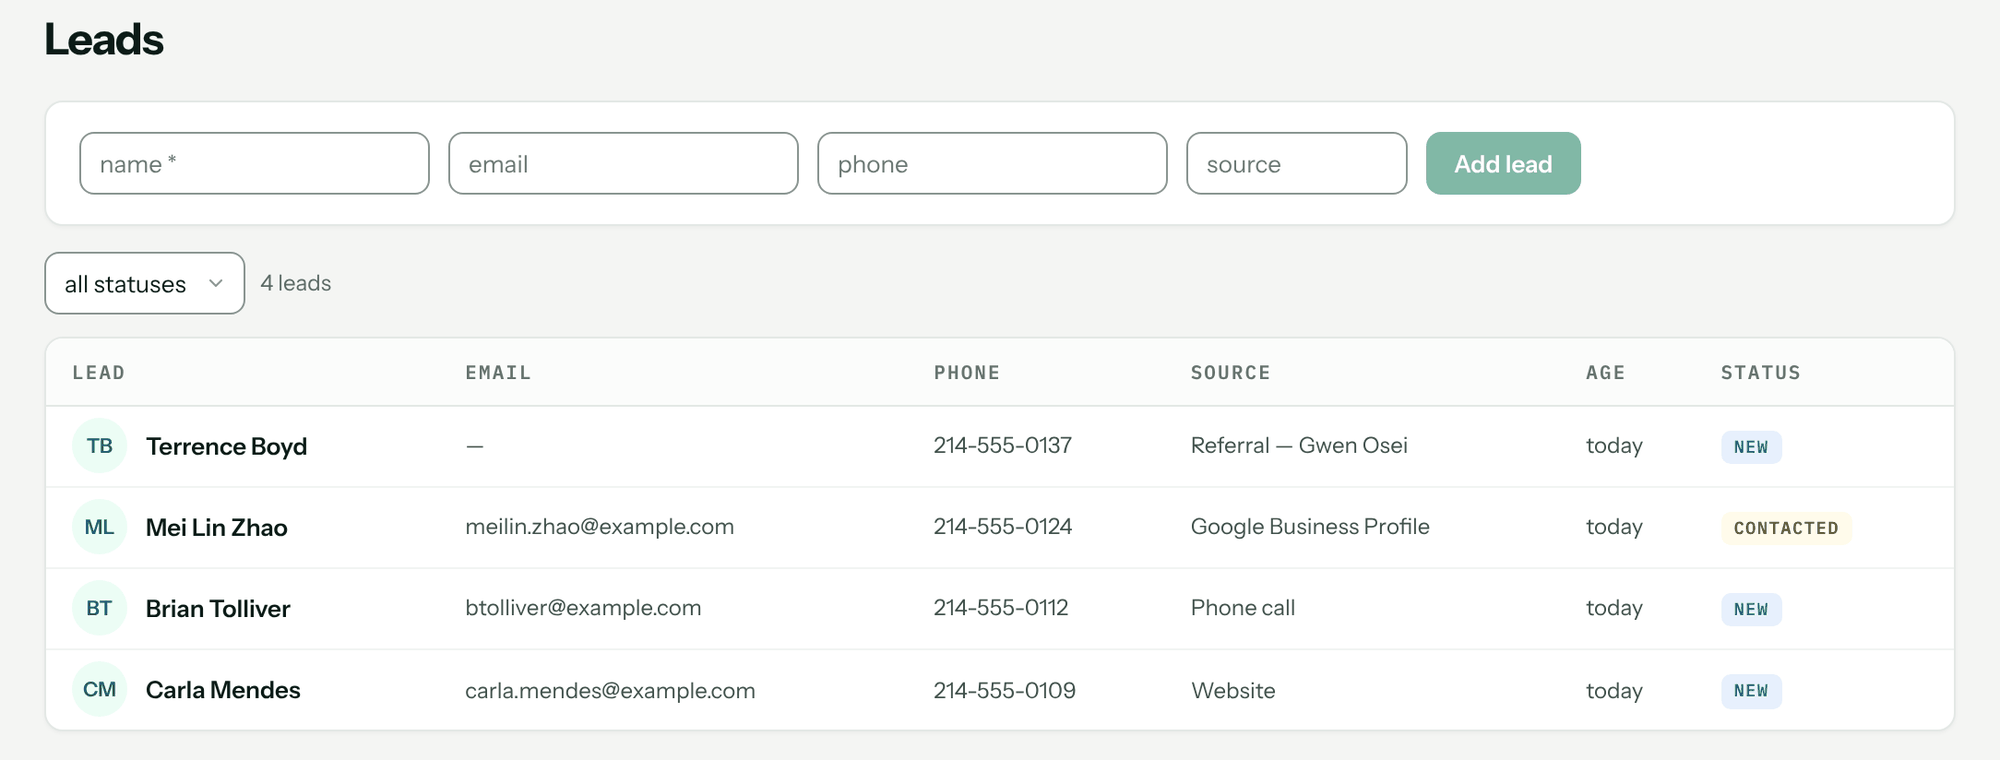
Click a lead to open it. The buttons at the top move it along:
| Status | Means | Can move to |
|---|---|---|
| New | Just came in. | Contacted, Unqualified |
| Contacted | You've reached them. | Unqualified, New |
| Unqualified | Not a fit — wrong area, tire-kicker, spam that got through. | New |
| Converted | Turned into a customer. Read-only from here. | — |
5. Convert the lead to a customer
When they book, open the lead and click Convert to customer. A customer is created with the lead's name, phone, email, lead source and notes, and you land on the new customer record. The lead stays in the list as Converted with a link, Open the customer record.
Conversion doesn't create a service address. Add one on the customer before you create a job — see Add customers, properties and equipment.
Turning a form off, rotating its link, deleting it
- Turn off stops the form taking submissions; the link shows "This form is no longer available." Turn on brings it back with the same link.
- Rotate link (Admin only) gives the form a new address. Every existing embed, link and QR code stops working immediately — use it if a form is being spammed, then paste the new embed code onto your site.
- Delete (Admin only) removes the form. Leads it already captured stay in your CRM.
Required lead fields
An admin can make email, phone or lead source required for leads added by hand, under CRM → CRM Admin → Jobs & field → Required fields. This applies to the Add lead row and the lead drawer, not to the public web form — the form's own required ticks decide that. See CRM Admin settings.
What it doesn't do
- A lead form doesn't book a time. To let homeowners pick a visit slot, see Let customers book their own estimate visit.
- Converting doesn't create a job, a quote or a service address; you add those on the customer.
- A converted lead can't be edited or moved back. Edit the customer instead.
Troubleshooting
| You see | Why | Fix |
|---|---|---|
| This form is no longer available. | The form is turned off, or its link was rotated. | Click Turn on, or copy the current link or embed code from the form editor. |
| The form doesn't load inside your website. | Only allow embedding on lists a different domain than the one your page is on. | Add your site's domain (for example both yoursite.com and www.yoursite.com), or clear the box. |
| Please leave a phone number or an email so we can reach you. | The homeowner left both blank. | Nothing to fix — or make phone required on the form. |
| That email address doesn't look right. | The email the homeowner typed isn't a valid address. | They correct it and send again. |
| Please complete the verification and try again. | The anti-bot check on the form wasn't completed. | The homeowner completes the check and sends again. |
| Missing required fields: Email | Email (or phone, or lead source) is required for leads under CRM Admin → Jobs & field → Required fields. | Fill it in, or untick it under Required fields. |
| converted leads are read-only — edit the customer instead | The lead has already been converted. | Open the customer record and edit there. |
| No email when a lead comes in. | Email new leads to is blank or has a typo. | Set the address and click Save, then send yourself a test submission. |
Questions: [email protected].